In this Tutorial we will take a look at how to crimp a RJ-45 network cable
What You’ll Need

Step One: Purchase your cable, your RJ-45 connectors and Measure the Length You Need.
Most Ethernet cable is sold on spools of varying lengths, so you might have to measure and cut the amount you need  Step Two: Strip the Outer Jacket Off

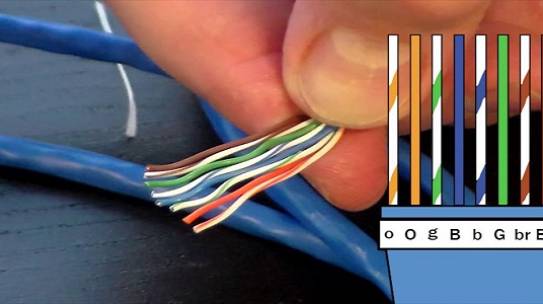
Step Three: Untwist and Separate All the Wires
Once you expose the inner wires, you’ll notice that there are four pairs of wires twisted together, resulting in eight wires total. These pairs come in different colors, with one being a solid color and the other being a white wire with a stripe matching the solid color and Untwist all four pairs so that you have eight separate wires.

Step Four: Put the Wires in the Correct Order and Prep Them for Cut
Grab your wire stripping tool or scissors and cut off the excess wiring so that only about a half-inch remains between the end and where the outer jacket begins. The goal is to have the wires short enough so that you can squeeze the outer jacket into the connector, crimping the connector over the jacket to make a secure connection (more on that later).

Step Five: Slide the Connector On and Crimp It
Grab your Ethernet plug connector and with the clip part facing away from you and the green wires facing the floor (or the ceiling, depending on orientation), slide the wires inside, making sure that each wire goes into its own slot.

Step Six:Crimping the cable
Carefully place the connector into the Ethernet Crimper and cinch down on the handles tightly. The copper splicing tabs on the connector will pierce into each of the eight wires.

Step Seventh:Test your cable if desired.
Make sure to test the cables before installing them.If you have a cable testing tool, insert both ends of your finished cable into the tool to check for a signal. The cable should now be ready to


1 Comment
Nannymed.Com
When wiring the connector, follow the layout shown. Your connector will conform to the T568B standard.