Use these steps to assign a static IP configuration using Control Panel:
- Open Control Panel.
- Click on Network and Internet.
- Click on Network and Sharing Center.
- Click the Change adapter settings option on the left navigation pane.
 Control Panel Network and Sharing Center
 - Right-click the network adapter and select the Properties option.
- Select the Internet Protocol Version 4 (TCP/IPv4) option.
- Click the Properties button.
 Control Panel’s network adapter properties
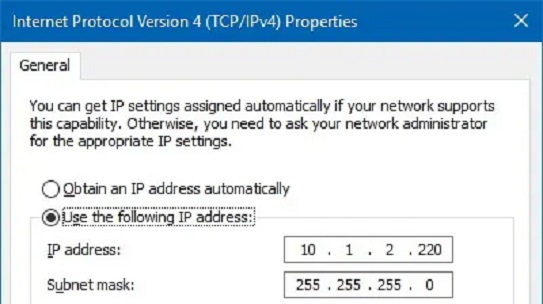
 - Select the Use the following IP address option.
- Assign the static IP address – for example, 10.1.2.220.
- Specify a Subnet mask. Typically, on a home network, the subnet mask is 255.255.255.0.
- Specify a Default gateway. (Usually, your router’s IP address. For example, 10.1.2.1.)
- Under the “Use the following DNS server addresses set Preferred DNS server” section, set the Preferred DNS server address, usually your router’s IP address or server IP address providing DNS resolutions (for example, 10.1.2.1).
- (Optional) Specify an Alternative DNS server, which the computer will use if it cannot reach the preferred DNS server.
- Click the OK button.
 Windows 10 network adapter TCP/IPv4 properties
 - Click the Close button again.
Once you complete the steps, you can open your web browser and load a website to see if the configuration works.